SUN GUN
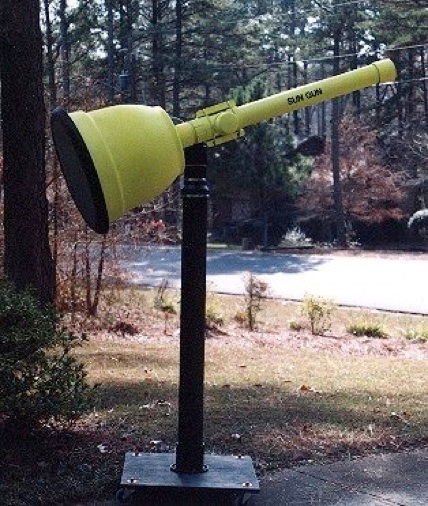
I wanted a solar scope, safe and portable, for group sun spot viewing. The designs I looked at did not lend themselves to group viewing , or the safety I wanted, especially with children. After many hours at the hardware store I designed the SUN GUN.
The SUN GUN consists of a 60mm dia. 900mm fl. optical tube assembly (Earth and Sky-Telescopes, www.astrosales.com/scopes.html), mounted inside of 3" dia. PVC, connected to a 20" flower planter with a rear projection screen mounted on top. When connecting the PVC parts lightly sand each connection and apply PVC cement to both connections. Home depot PVC was used through out the design, found some suppliers to have a different inside diameter.
TELESCOPE ASSEMBLY: Connect a 28.5" piece of 3" PVC to one side of a 3" tee, on the other side connect a 3" cleanout adapter with female threads. Take a 3" cap and connect a 3" piece of 3" PVC to it, this will be a cover for the remaining side of the tee, do not cement it to the tee. Take the optical tube assembly, remove the lens cap, and twist off the light shield. Remove the bracket holding the pinion gear, remove the gear and focusing assembly. Remove the knob that can be unscrewed from the focusing assembly, this will not be used. Obtain two Hoover vacuum cleaner belts B-20, type 48 (Home Depot Part Number 074999020202 ). Cut a section out of the belts so they will just snap over the optical Tube Assembly, super glue the belts back together. Install one of the belts on the lens end of the optical tube assembly, then push the assembly through the cleanout adapter, tee, and 28.5" PVC, in that direction. Let the optical tube assembly extended a couple inches beyond the tube, then install the other belt and pull the optical tube assembly back into the PVC until the focuser is centered in the tee, the belts will end up near each end of the optical tube assembly. The optical tube assembly will still be extended about a half inch from the end. Turn the optical tube assembly so that the pinion gear and shilf with one knob can be reinstalled with the bracket. After the shaft with one knob has been installed turn the optical tube assembly so the knob is accessible in the tee. Install a .965" to 1.25" eyepiece adapter, because the 60mm telescope came with a .965" eyepiece holder. This worked out ok because the eyepiece is extended beyond the 3" cleanout adapter when the rear projection section is removed, giving easy access to the eyepiece. Install a 1" length of 3" PVC inside of a 3" PVC coupling. The light shield from the optical tube assembly is pushed into the 3" PVC coupling, the top end first, until the ridge on the shield meets the 1” length of 3" PVC inside of the coupling. This is installed, but not cemented, on top of the optical tube assembly and the 28.5" PVC giving access to the optical tube assembly for adjustment.

REAR PROJECTION ASSEMBLY: Install 3" PVC 3" long pipe into a floor flange, and install a 3" PVC male adapter onto this. On the outside bottom of a 20" flower pot ( Home Depot part number 087404560200 ) center the floor flange and drill four mounting holes. Mount the floor flange on the outside to a closet flange extension ring on the inside. Cut out the bottom of the flower pot using the inside of the closet flange extension ring as a guide. Drill mounting holes in each of the four tabs on a SPEEDTRON 20" photographic light diffuser (SPEEDOTRON part number 25529). Cut out the diffuser that comes with it, the outside ring is only used. Tack the corners of a 2' by 2' Da-Tex rear projection screen (Da-Lite Screen Company 800-622-3737, www.da-lite.com), polished side up, stretched between two nailed down two by fours. Apply super glue to the bottom of the 20" light diffuser ring, press the diffuser ring, glue down, onto the rear projection screen. Hold until set up. Align the diffuser ring with the rear projection screen on the top lip of the flower pot, mark where the mounting holes are in the tabs on the diffuser ring on the flower pot. Remove diffuser ring and drill holes. Set aside, the rear projection screen is the last thing to be mounted in the assembly.
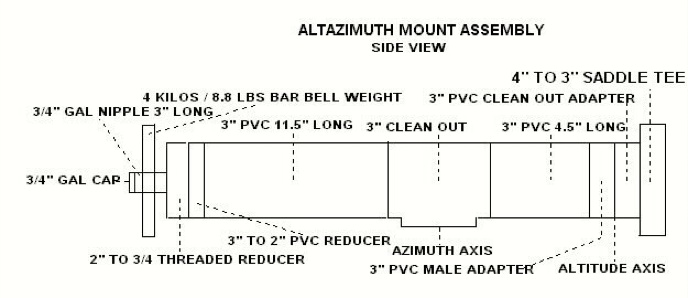
ALTAZIMUTH MOUNT ASSEMBLY: On a 3" PVC clean out tee install a 3" PVC 4.5" long piece. Connect a 3” PVC male adapter to this. Install a 3" PVC clean out adapter to a 4" to 3" saddle tee, and screw this onto the 3" PVC male adapter, this being the altitude axis. On the other side of the clean out tee install a 3" PVC 11.5" long piece, and connect to this a 3" to 2" PVC reducer. To the reducer install a 2" to 3/4" PVC threaded reducer. Screw a 3/4" gal nipple 3" long into the threaded reducer. Put a 4 kilos/8.8 lbs bar bell weight on the 3/4" gal nipple, and install a 3/4" gal cap on the nipple. The threaded connection of the 3" PVC clean out tee and the male 3" PVC male adapter on the pedestal make up the azimuth axis.
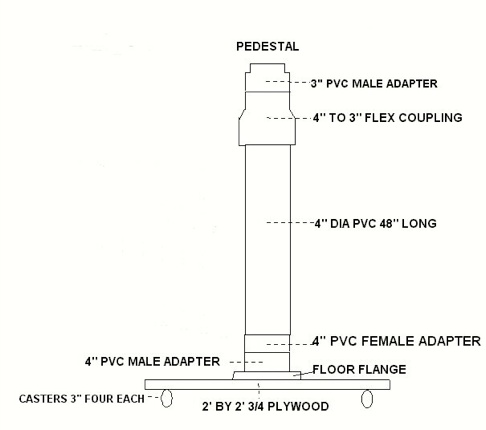
PEDESTAL ASSEMBLY: Mount four 3" casters on the corners of a 2' by 2' by 3/4" piece of plywood. Install a 2" length of 4" PVC on a floor flange, and connect a 4" PVC male adapter to this. Center the floor flange on the 2' by 2' plywood, drill four holes, and secure with nuts and bolts. Cut a ½" piece off the end of a 3" PVC coupling. Install the ½" coupling piece flush to the top, on the inside, of a 48" long piece of 4" PVC. Install a 4" PVC female adapter to the other end of the 48" long piece of 4" PVC. Install the 3" PVC coupling, the ½" piece was cut off from, on to the bottom of a 45" length of 3" PVC. Insert the 45" length of 3" PVC, the end opposite the 3" PVC coupling, through the 4" PVC female adapter on the 48" length of 4" PVC up the inside of the 4" PVC, and out the top through the ½" 3" coupling piece. Sand down the inside of a 4" to 3" rubber flex coupling ,otherwise its near impossible to get on. Install the flex coupling over the 4" PVC and the 3" PVC. On the top of the 45" long 3" PVC install a 3" PVC male adapter.
FINAL ASSEMBLY: mask everything not to be painted. Do not paint the 45" long 3" PVC inside of the pedestal. Prime all the PVC and paint the telescope and projection assembly a bright color, the prototype is florescent yellow. Paint the inside of the flower pot and its rim flat black. Screw the pedestal onto the base. Screw the Altazimuth mount onto the 3" male adapter on the top of the pedestal. Mount the telescope to the altazimuth mount, with the saddle clamps over the 3" tee. Install a 12.5mm eyepiece with a # 12 eyepiece filter in the eyepiece holder. Mount the rear projection screen assembly on top of the flower pot, with the drilled taps on the diffuser, and holes in flower pot top rim. With a 10mm eyepiece and a #15 deep yellow eyepiece filter, a 19" image is obtained with the SUN GUN. Better contrast is obtained with a 12.5mm eyepiece and a #12 yellow eyepiece filter giving a 18" image and a 2" border. Enjoy